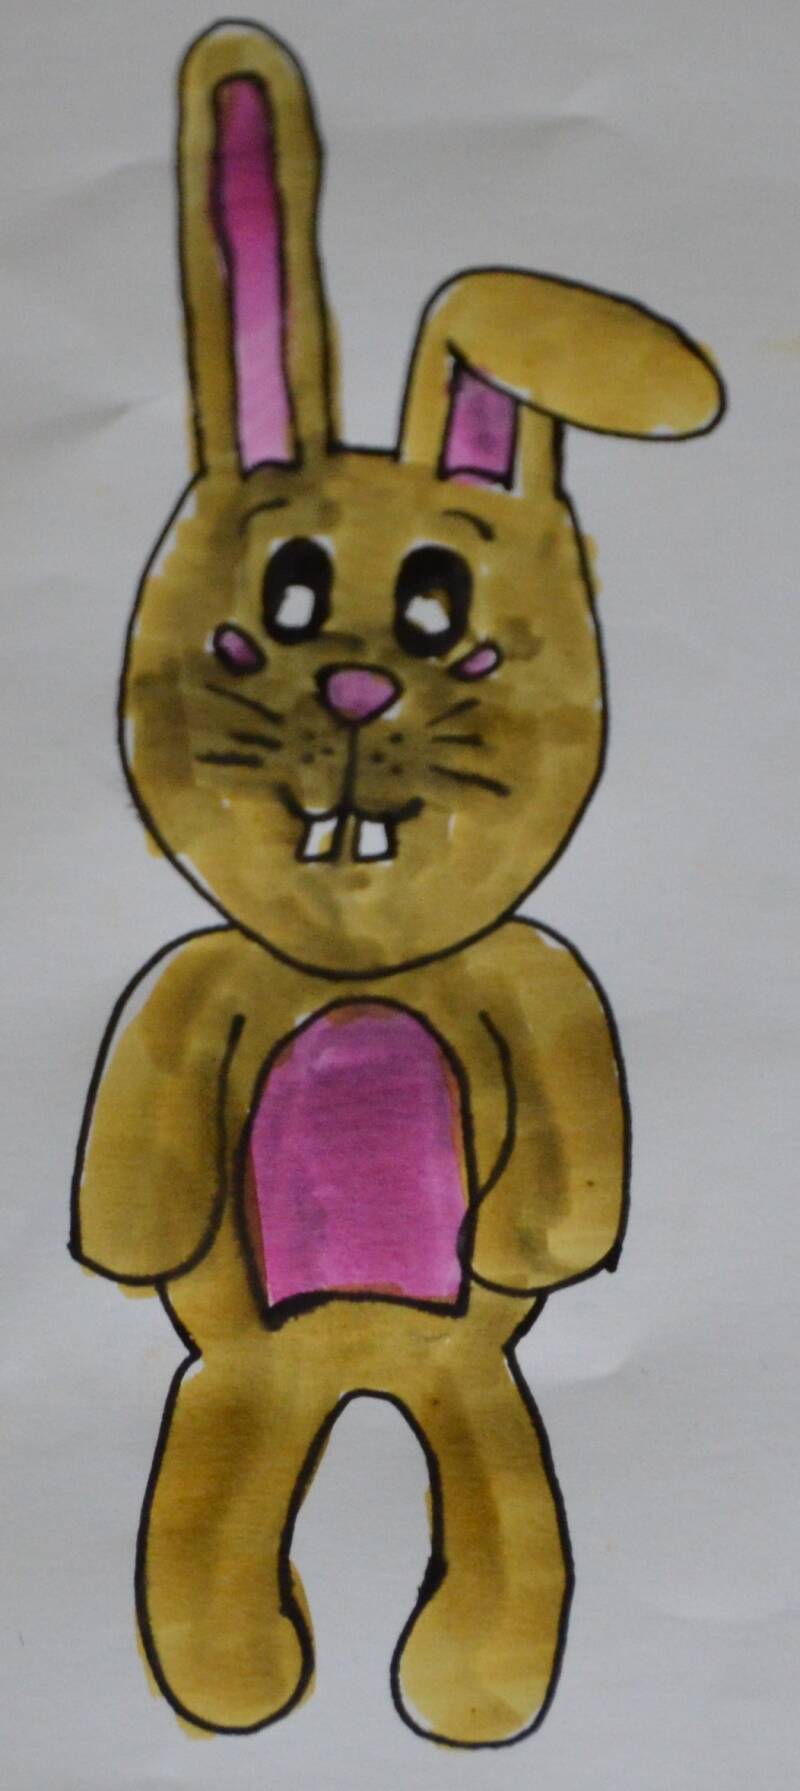
Paashaas
![](https://primary.jwwb.nl/public/n/s/o/temp-ivegakaqllrumiqmfbvp/lnpw5c/DSC_0556-1.jpg?enable-io=true&enable=upscale&crop=1052%2C2355%2Cx0%2Cy1%2Csafe&width=164&height=367)
Stappenplan:
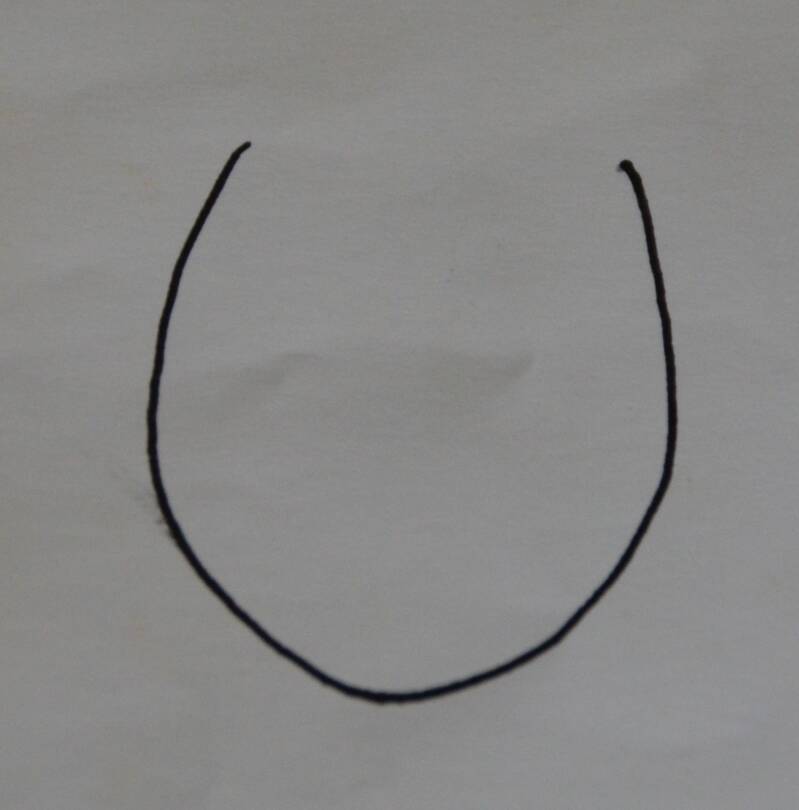
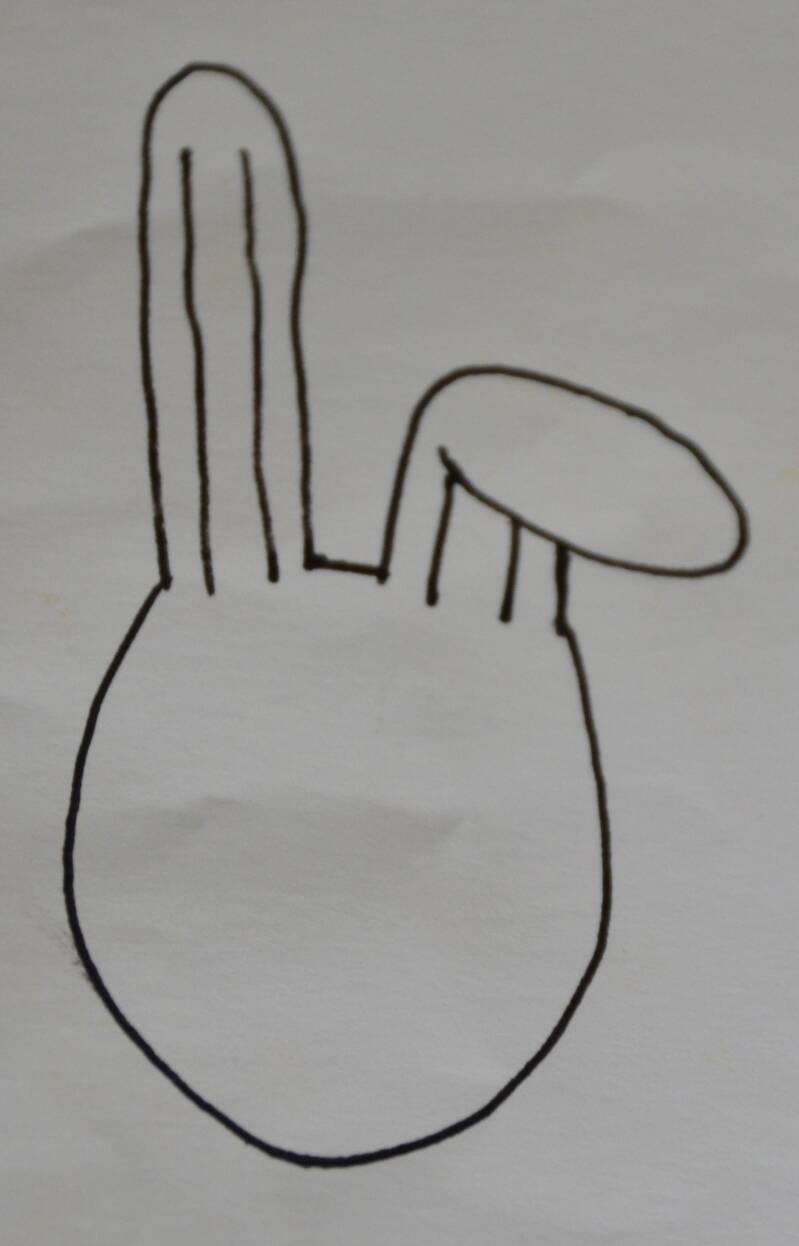
Stap1: Begin met een rond bakje te tekenen .
![](https://primary.jwwb.nl/public/n/s/o/temp-ivegakaqllrumiqmfbvp/u35bsi/DSC_0534-1.jpg?enable-io=true&enable=upscale&crop=1626%2C1648%2Cx0%2Cy0%2Csafe&width=150&height=152)
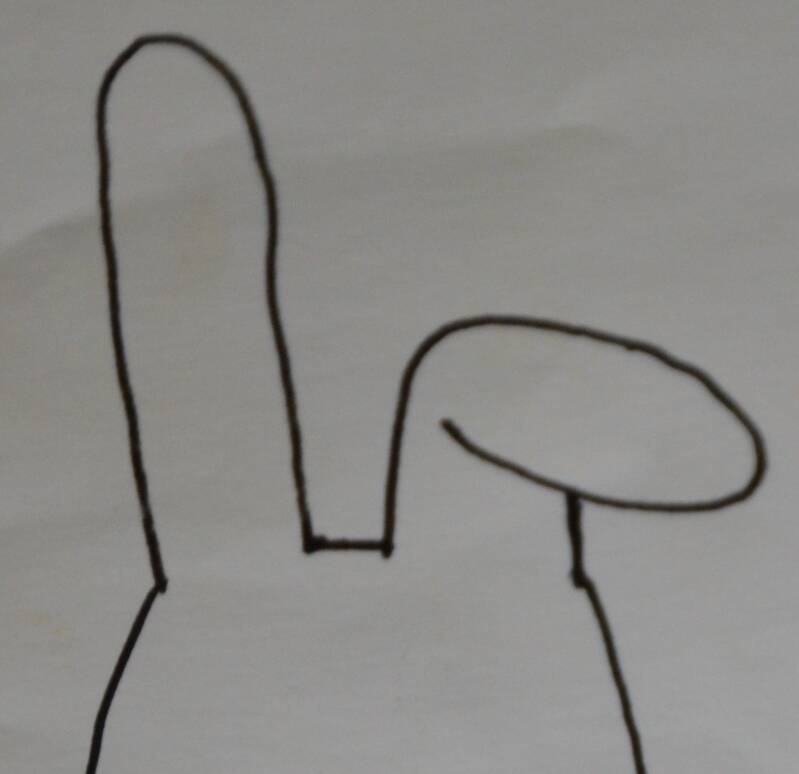
Stap2: Aan het linker uiteinde van het bakje teken je een lange, smalle boog.
![](https://primary.jwwb.nl/public/n/s/o/temp-ivegakaqllrumiqmfbvp/ehjqtk/DSC_0535-1.jpg?enable-io=true&enable=upscale&crop=1550%2C2553%2Cx0%2Cy2%2Csafe&width=150&height=247)
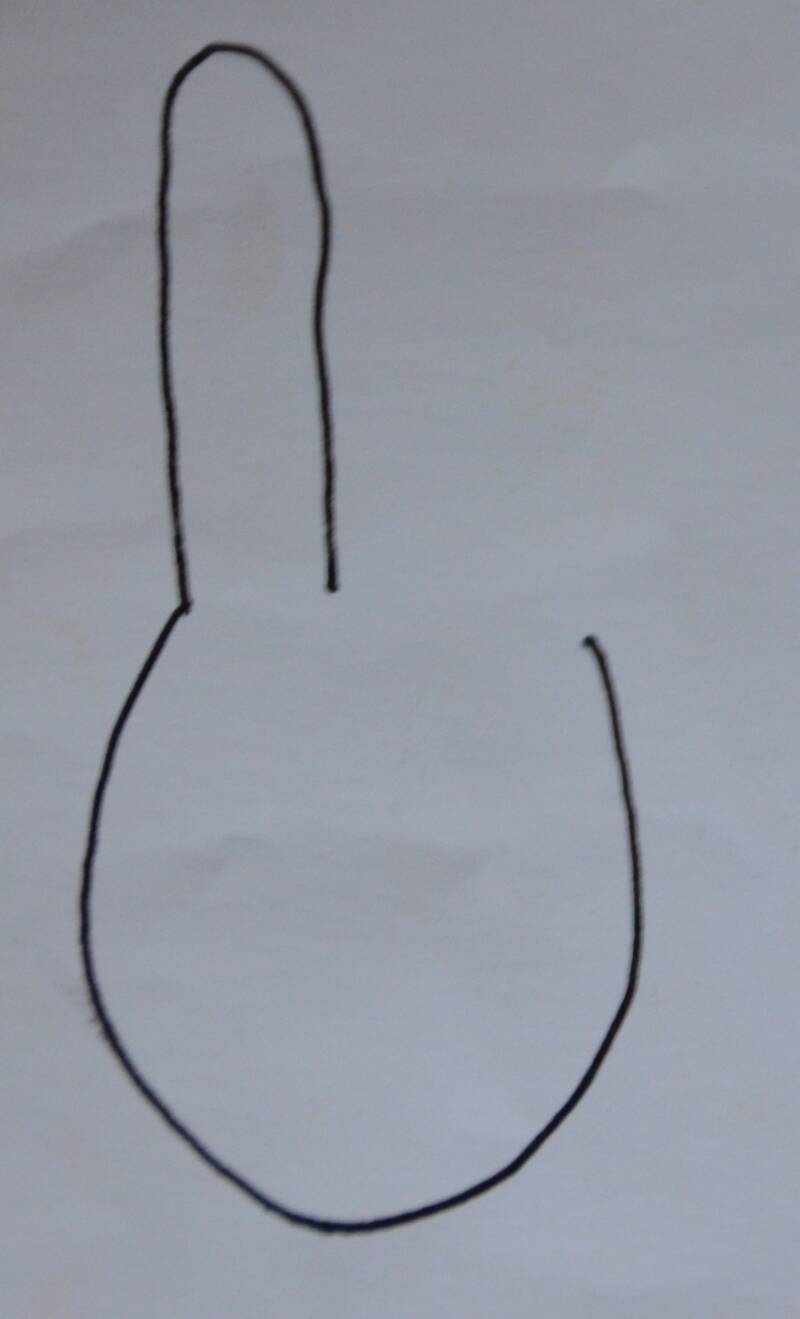
Stap3: Rechts van de boog teken je een hoekige en uitgerekte haak.
![](https://primary.jwwb.nl/public/n/s/o/temp-ivegakaqllrumiqmfbvp/46dcr0/DSC_0536-1.jpg?enable-io=true&enable=upscale&crop=1732%2C2465%2Cx0%2Cy1%2Csafe&width=149&height=212)
Stap4: Teken nu een recht streepje van de haak tot aan het rechter uiteinde van het bakje.
![](https://primary.jwwb.nl/public/n/s/o/temp-ivegakaqllrumiqmfbvp/q7qp4r/DSC_0537-1.jpg?enable-io=true&enable=upscale&crop=1655%2C2359%2Cx1%2Cy0%2Csafe&width=148&height=211)
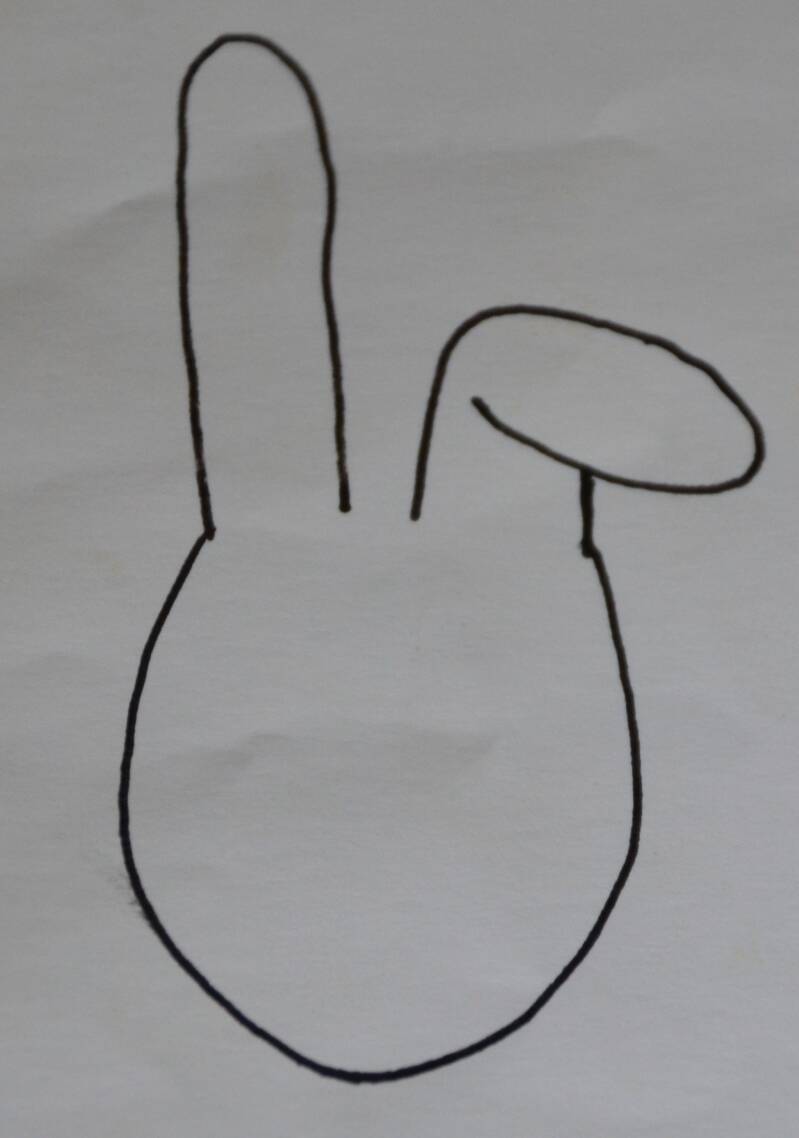
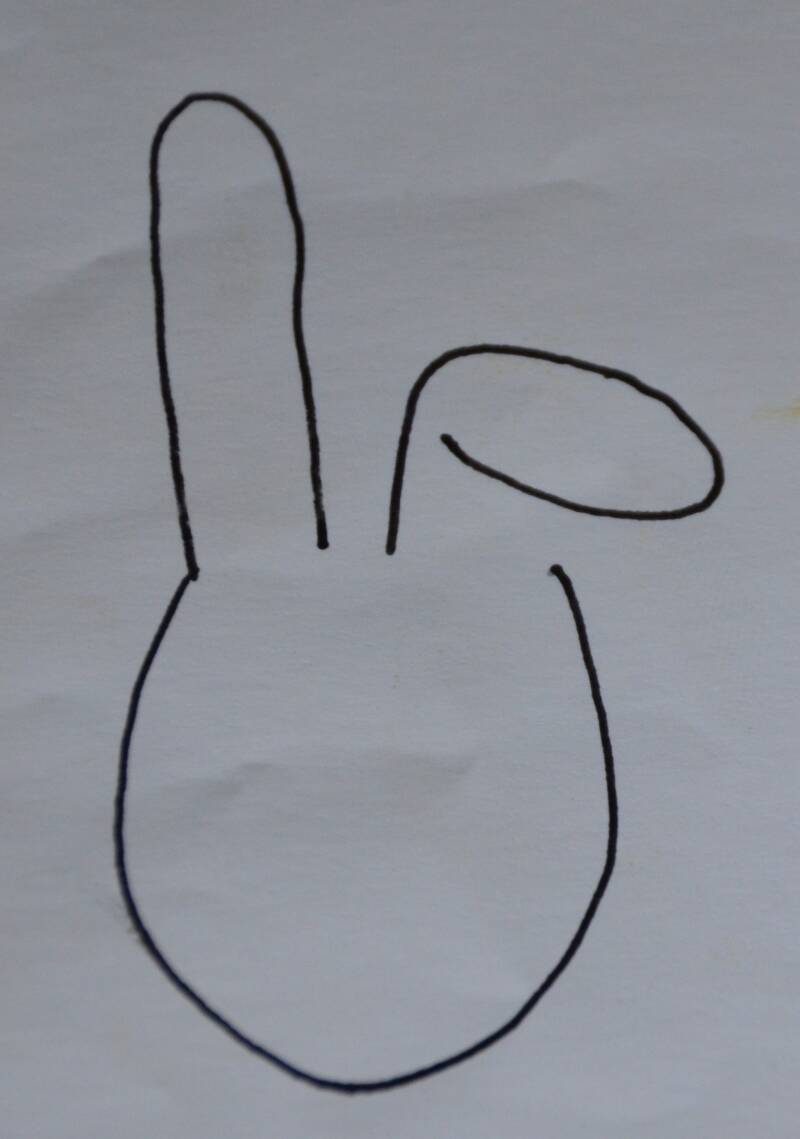
Stap5: De haak verbind je met de boog door er een klein streepje tussen te tekenen.
![](https://primary.jwwb.nl/public/n/s/o/temp-ivegakaqllrumiqmfbvp/p2b1ey/DSC_0538-1.jpg?enable-io=true&enable=upscale&crop=1501%2C1451%2Cx0%2Cy2%2Csafe&width=148&height=143)
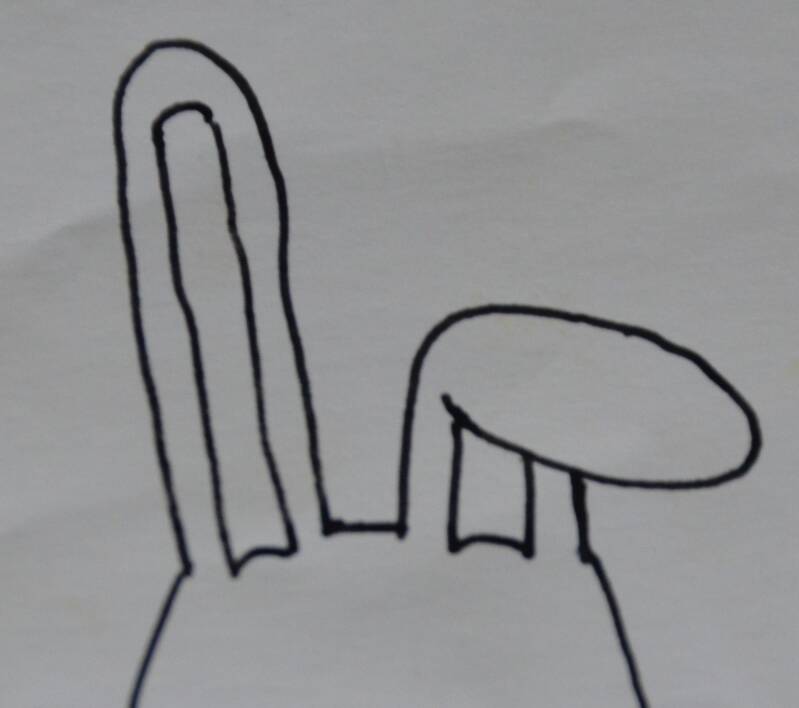
Stap6: In de smalle boog teken je twee rechte, verticale lijnen.
![](https://primary.jwwb.nl/public/n/s/o/temp-ivegakaqllrumiqmfbvp/o6fnxt/DSC_0539-1.jpg?enable-io=true&enable=upscale&crop=1681%2C2364%2Cx1%2Cy0%2Csafe&width=150&height=211)
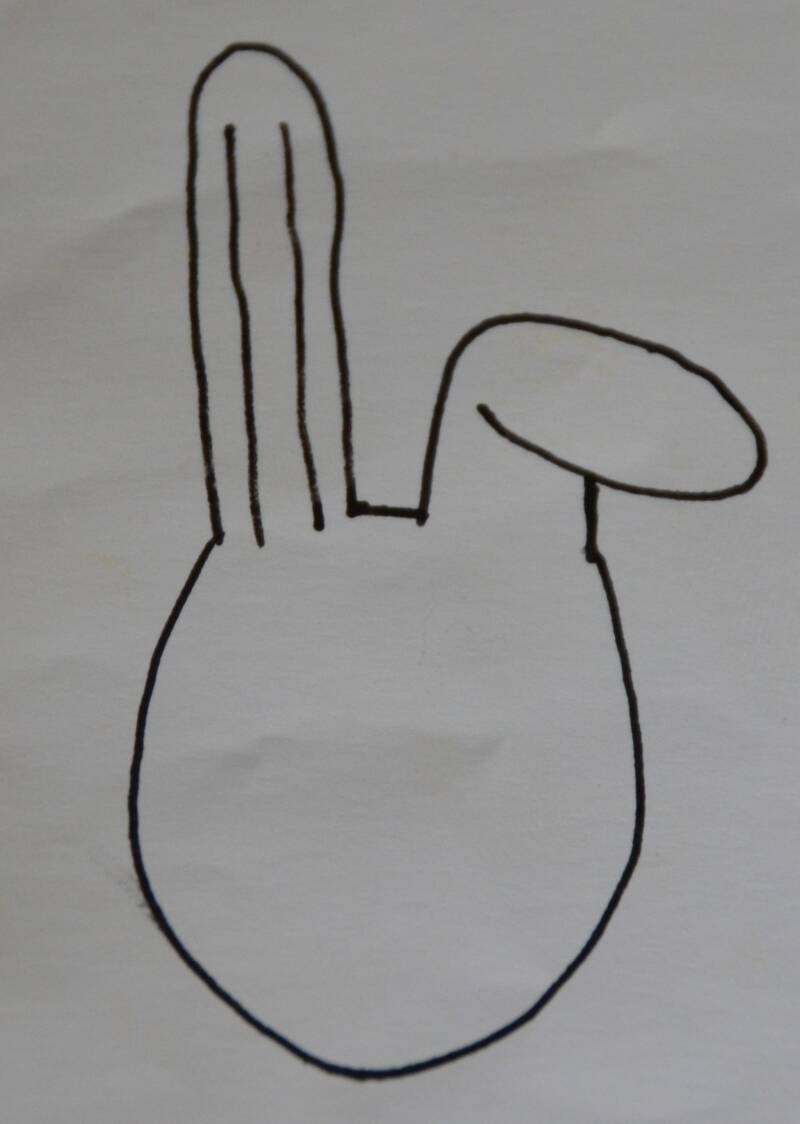
Stap7: Ook in het onderste gedeelte van de haak teken je twee rechte, verticale lijnen. Zorg dat de lijnen tegen het bovenste gedeelte van de haak komen.
![](https://primary.jwwb.nl/public/n/s/o/temp-ivegakaqllrumiqmfbvp/9eo29e/DSC_0540-3.jpg?enable-io=true&enable=upscale&crop=1582%2C2468%2Cx0%2Cy0%2Csafe&width=150&height=234)
Stap8: Verbind bij aan beide kanten de lijnen met boogjes die naar boven wijzen. Doe dit bij de 1e twee lijnen zowel boven als onder.
![](https://primary.jwwb.nl/public/n/s/o/temp-ivegakaqllrumiqmfbvp/ui8h88/DSC_0541.jpg?enable-io=true&enable=upscale&crop=1591%2C1410%2Cx0%2Cy0%2Csafe&width=150&height=133)
Stap9: Aan het hoofdje teken je twee bogen die naar onder wijzen.
![](https://primary.jwwb.nl/public/n/s/o/temp-ivegakaqllrumiqmfbvp/pqzrip/DSC_0542.jpg?enable-io=true&enable=upscale&crop=1708%2C1504%2Cx0%2Cy2%2Csafe&width=150&height=132)
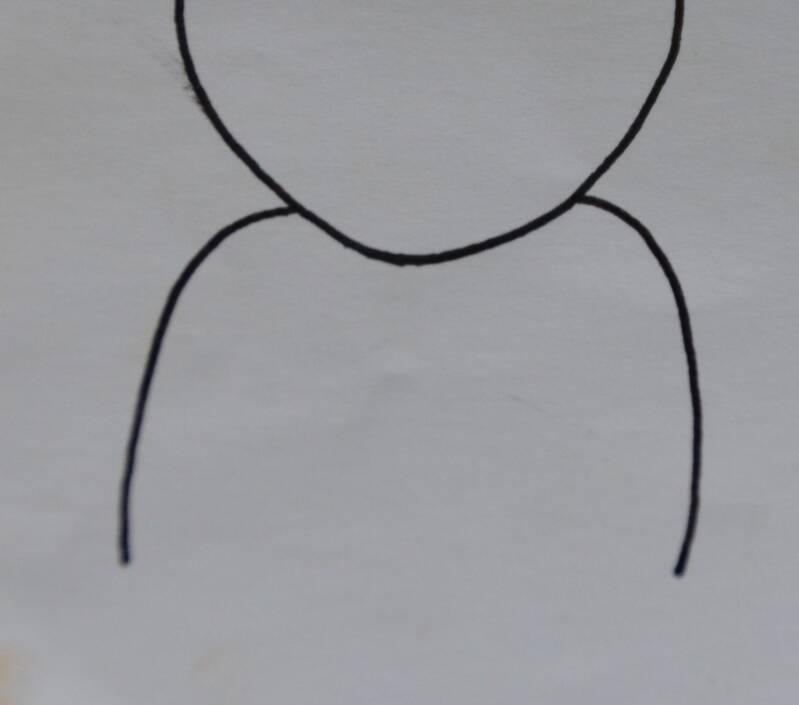
Stap10: Nu teken je aan de boog een haak.
![](https://primary.jwwb.nl/public/n/s/o/temp-ivegakaqllrumiqmfbvp/ru0cw1/DSC_0543-1.jpg?enable-io=true&enable=upscale&crop=1916%2C1622%2Cx2%2Cy0%2Csafe&width=150&height=127)
Stap11: Vervolgens teken je aan elke arm een klein boogje. Let op dat de boogjes beide naar binnen wijzen.
![](https://primary.jwwb.nl/public/n/s/o/temp-ivegakaqllrumiqmfbvp/5131zs/DSC_0544-1.jpg?enable-io=true&enable=upscale&crop=1658%2C1271%2Cx1%2Cy0%2Csafe&width=150&height=115)
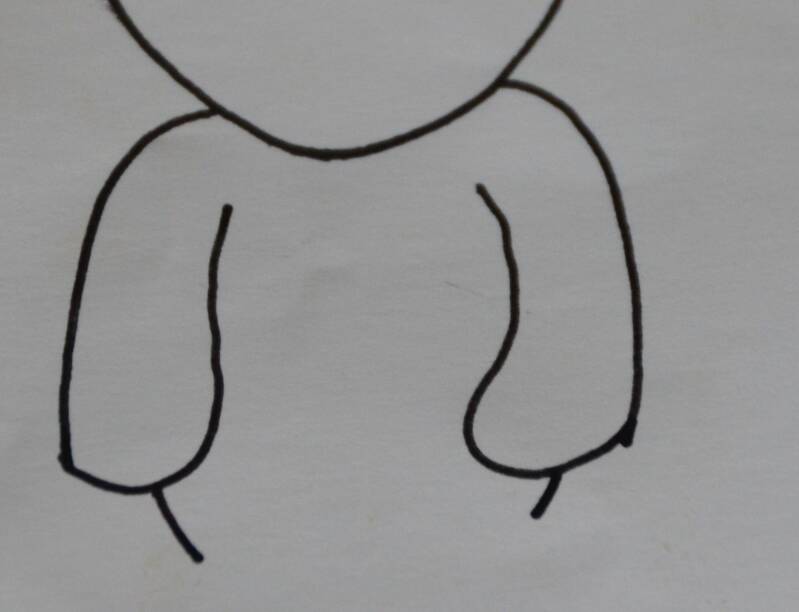
Stap12: Teken aan elk boogje een haak. Ook deze wijzen naar binnen.
![](https://primary.jwwb.nl/public/n/s/o/temp-ivegakaqllrumiqmfbvp/1ql6hu/DSC_0545-1.jpg?enable-io=true&enable=upscale&crop=1369%2C1755%2Cx0%2Cy1%2Csafe&width=149&height=191)
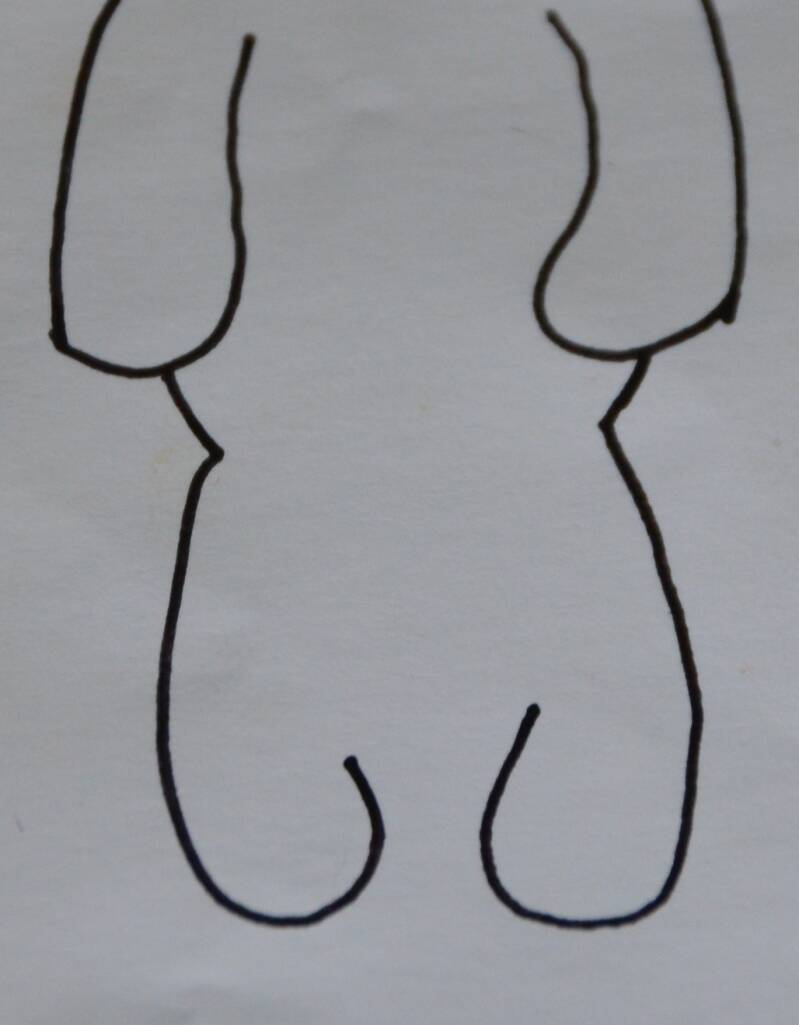
Stap13: Verbind de haken met elkaar met een omgekeerde U-vormige boog.
![](https://primary.jwwb.nl/public/n/s/o/temp-ivegakaqllrumiqmfbvp/4zez21/DSC_0546-1.jpg?enable-io=true&enable=upscale&crop=1433%2C1637%2Cx0%2Cy2%2Csafe&width=148&height=169)
Stap14: In de buik teken je ook een omgekeerde U-vormige boog.
![](https://primary.jwwb.nl/public/n/s/o/temp-ivegakaqllrumiqmfbvp/8rcv8k/DSC_0547-1.jpg?enable-io=true&enable=upscale&crop=1698%2C1963%2Cx2%2Cy0%2Csafe&width=147&height=170)
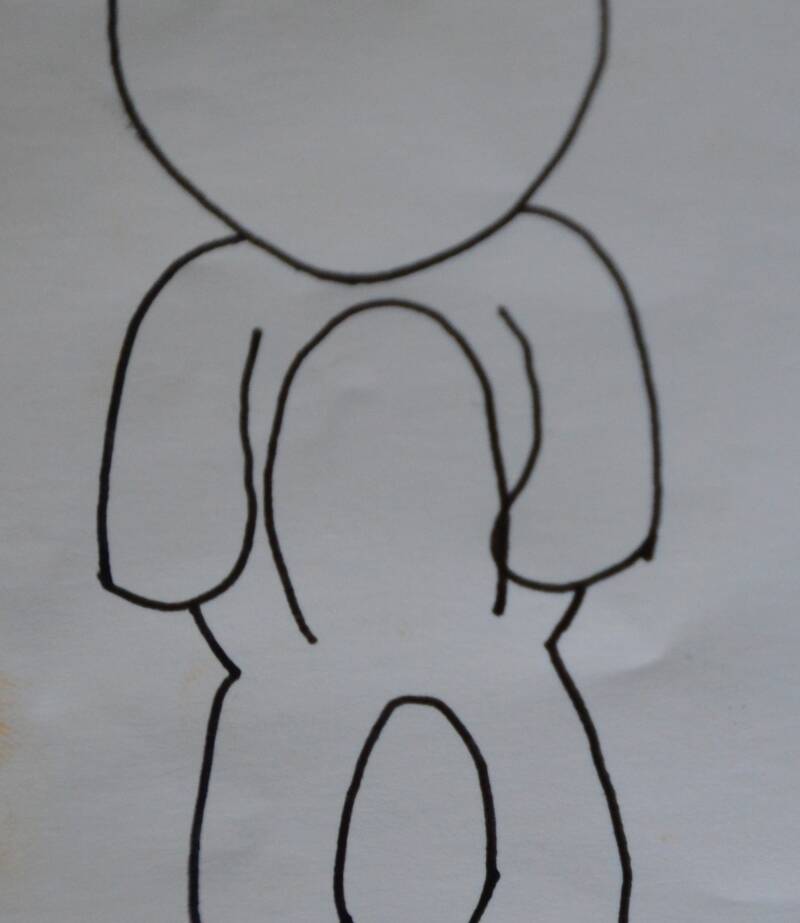
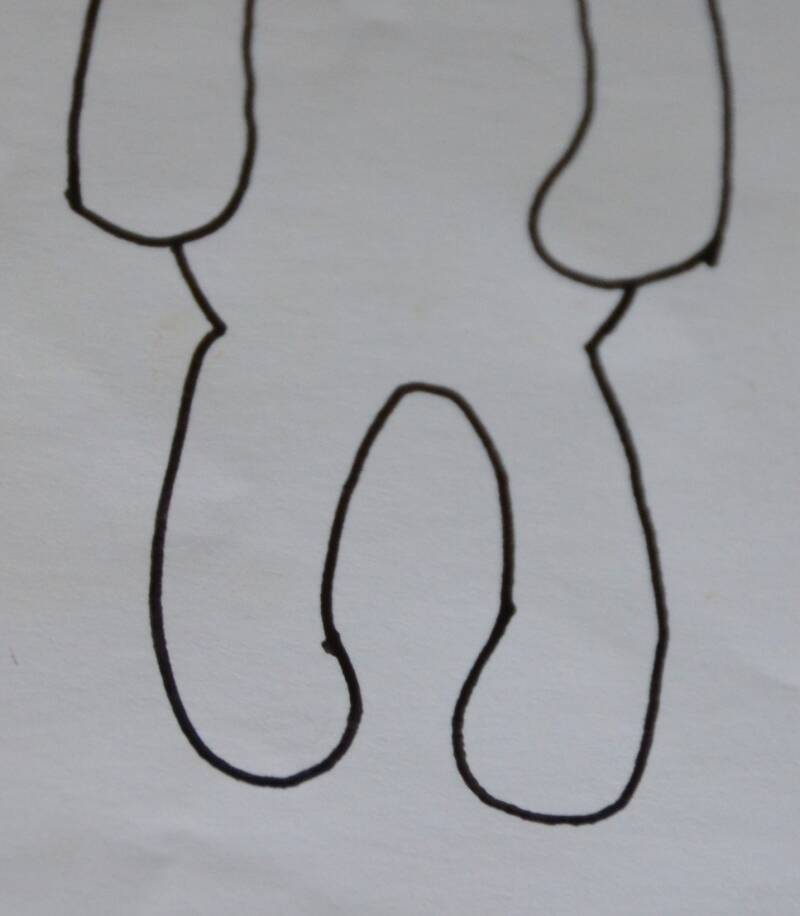
Stap15: Tussen de twee uiteindes van de boog teken je een lichte boog om hen te verbinden met elkaar.
![](https://primary.jwwb.nl/public/n/s/o/temp-ivegakaqllrumiqmfbvp/4gvohj/DSC_0548.jpg?enable-io=true&enable=upscale&crop=1763%2C1596%2Cx0%2Cy1%2Csafe&width=147&height=133)
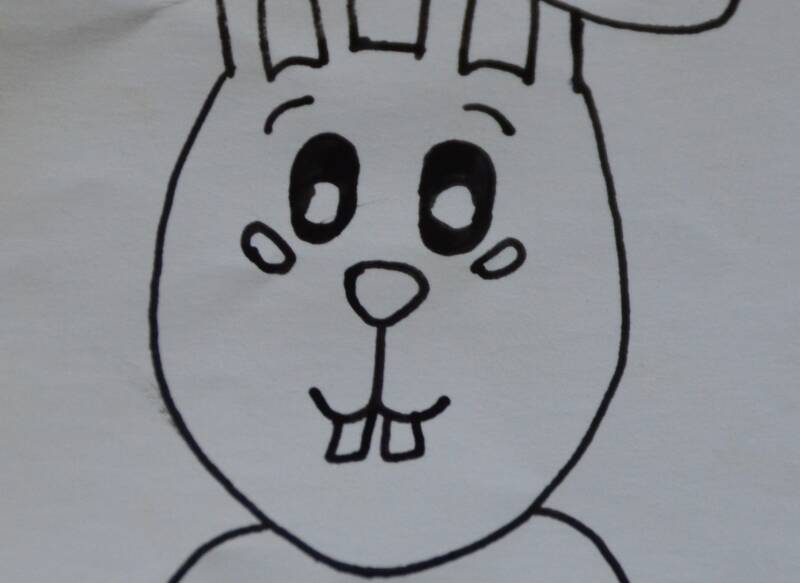
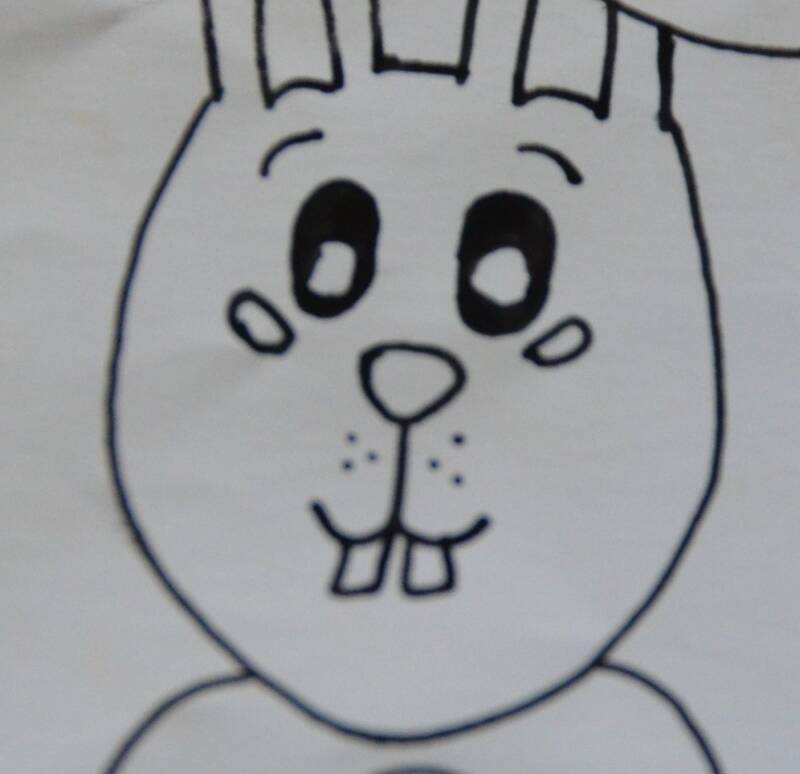
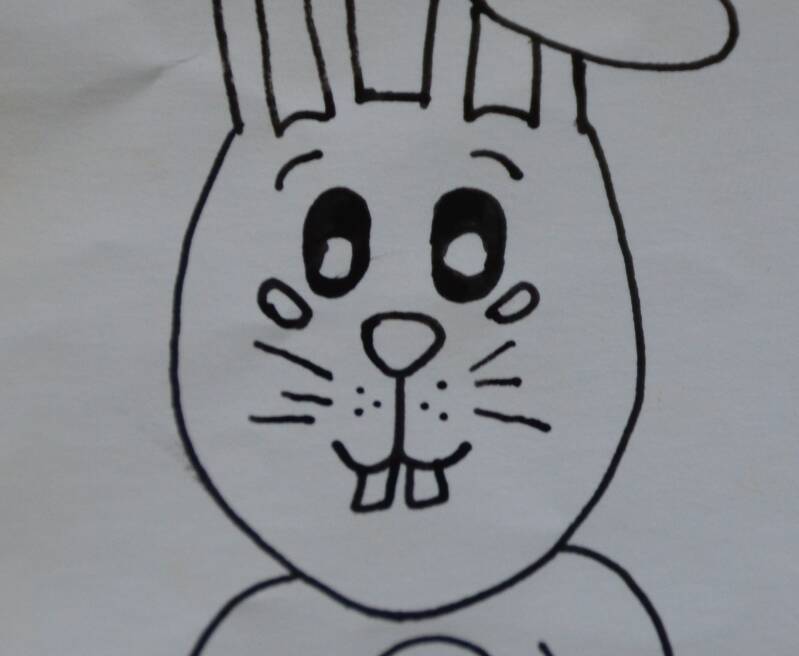
Stap16: Teken nu twee ogen in het hoofdje met daarboven 2 wenkbrauwen.
![](https://primary.jwwb.nl/public/n/s/o/temp-ivegakaqllrumiqmfbvp/romohx/DSC_0549-4.jpg?enable-io=true&enable=upscale&crop=1913%2C1483%2Cx3%2Cy0%2Csafe&width=147&height=114)
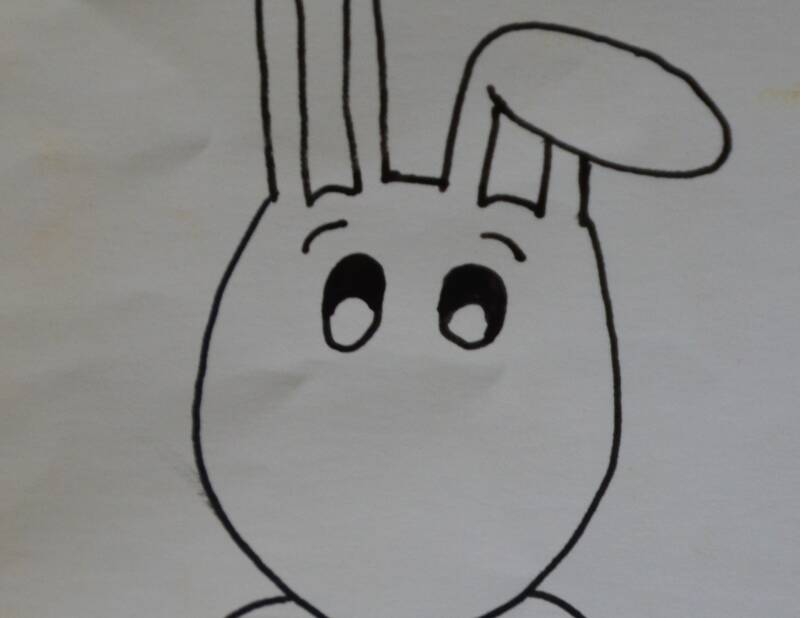
Stap17: Onder de ogen teken je twee schuine ovaaltjes.
![](https://primary.jwwb.nl/public/n/s/o/temp-ivegakaqllrumiqmfbvp/tsi1lk/DSC_0550.jpg?enable-io=true&enable=upscale&crop=1604%2C1419%2Cx0%2Cy1%2Csafe&width=147&height=130)
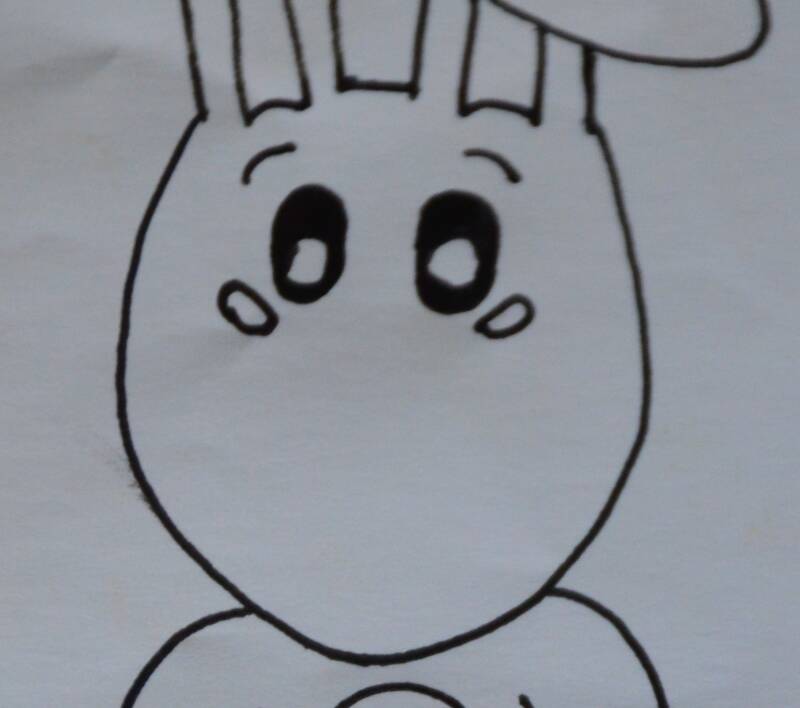
Stap18: Om de neus te tekenen begin je met een driehoek die naar beneden wijst.
![](https://primary.jwwb.nl/public/n/s/o/temp-ivegakaqllrumiqmfbvp/cy9e1l/DSC_0551.jpg?enable-io=true&enable=upscale&crop=1811%2C1208%2Cx0%2Cy1%2Csafe&width=147&height=98)
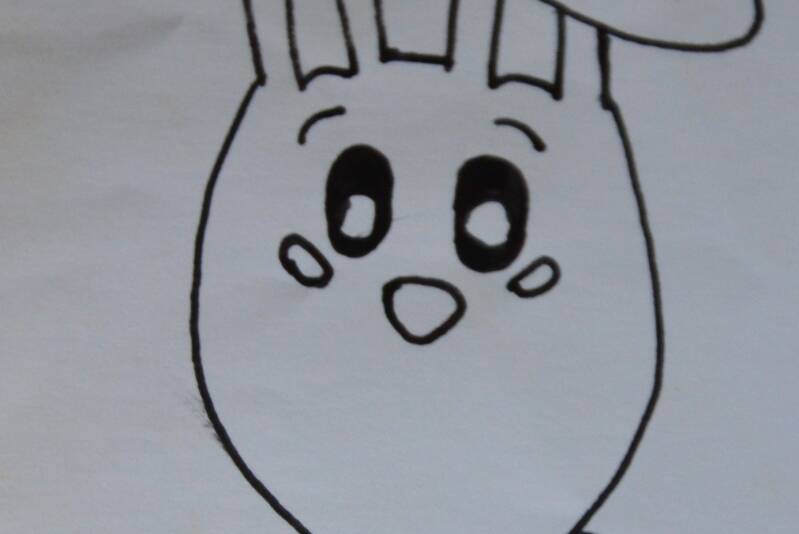
Stap19: Aan de driehoek teken je een anker vast.
![](https://primary.jwwb.nl/public/n/s/o/temp-ivegakaqllrumiqmfbvp/asp0l6/DSC_0552-1.jpg?enable-io=true&enable=upscale&crop=1918%2C1226%2Cx1%2Cy0%2Csafe&width=147&height=94)
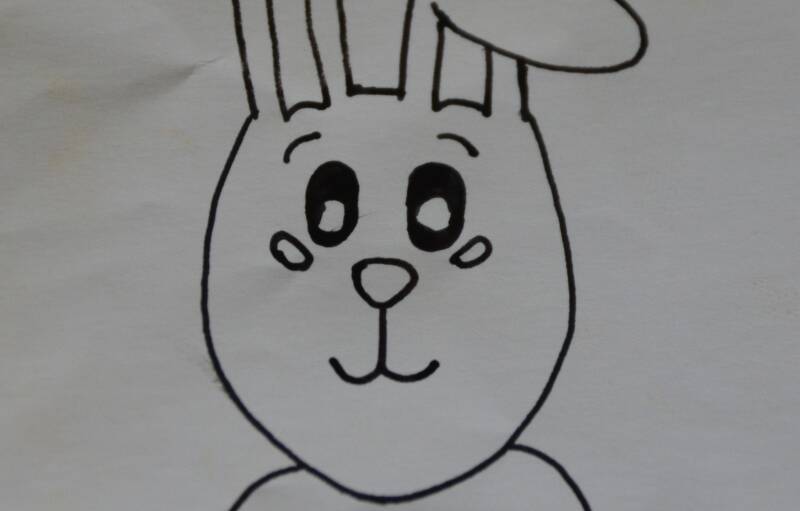
Stap20: Teken nu nog twee rechthoekjes aan je anker vast.
![](https://primary.jwwb.nl/public/n/s/o/temp-ivegakaqllrumiqmfbvp/b05rii/DSC_0553-1.jpg?enable-io=true&enable=upscale&crop=1811%2C1319%2Cx0%2Cy1%2Csafe&width=147&height=107)
Stap21: Eventueel teken je aan elke kant van je anker 3 kleine stipjes.
![](https://primary.jwwb.nl/public/n/s/o/temp-ivegakaqllrumiqmfbvp/2uqhtb/DSC_0554-1.jpg?enable-io=true&enable=upscale&crop=1404%2C1357%2Cx0%2Cy1%2Csafe&width=147&height=142)
Stap22: Vervolgens teken je aan elke kant ook nog drie rechte lijnen.
![](https://primary.jwwb.nl/public/n/s/o/temp-ivegakaqllrumiqmfbvp/qabeq6/DSC_0555-1.jpg?enable-io=true&enable=upscale&crop=1828%2C1504%2Cx2%2Cy0%2Csafe&width=147&height=121)
Stap23: Geef nu nog wat kleur aan je tekening en dan ben je klaar.
![](https://primary.jwwb.nl/public/n/s/o/temp-ivegakaqllrumiqmfbvp/bknc3m/DSC_0556-2.jpg?enable-io=true&enable=upscale&crop=1052%2C2355%2Cx0%2Cy1%2Csafe&width=147&height=329)
Maak jouw eigen website met JouwWeb